前端搭建 MCP Client(Web版)+ Server + Agent 实践
 花楸树约 14 分钟
关注更多AI编程资讯请去AI Coding专区:https://juejin.cn/aicoding
先上个效果图,上图是在 web 版
Client 中使用 todoist-mcp-server 帮我新建了一条 todolist。
本文主要介绍整体的思路和实现以及踩坑记录。
前言
MCP(Model Context Protocol)是一种开放协议,旨在通过标准化接口实现大语言模型(LLMs)与外部数据源及工具的无缝集成。MCP由 Anthropic 公司在2024年底推出,其设计理念类似于USB接口,为AI模型提供了一个“即插即用”的扩展能力,使其能够轻松连接至不同的工具和数据源。想深入了解可查看 官方文档,这里只做实战经验分享。
概念介绍
❝❞
MCP Hosts(MCP 应用):如Claude Desktop、IDE、AI应用等,希望通过MCP访问数据或工具。 MCP Clients(MCP 客户端):与一对一与服务端进行连接,相当于我们应用中实现数据库交互需要实现的一个客户端。 MCP Servers(MCP 服务端):基于MCP协议实现特定功能的程序。 Local Data Sources:本地数据源,公MCP服务器进行本地访问。 Remote Services:远端服务,供MCP服务器访问远端访问,例如api的方式。
本文主要搭建 Web 版本的 MCP Client 和 MCP Server。
技术栈
系统要求:Node.js >= 18(本地用了v20)
核心依赖库:CopilotKit、LangChain及其生态。
CopilotKit:React UI + 适用于 AI Copilot、AI 聊天机器人和应用内 AI 代理的优雅基础架构。 LangChain.js 和 LangGraph:LangChain相关主要用于开发agent。 langchainjs-mcp-adapters :提供了一个轻量级的包装器,使得 MCP 与 LangChain.js 兼容。 modelcontextprotocol/typescript-sdk:MCP TypeScript SDK open-mcp-client:CopilotKit 开源的 MCP Client。 mcp-server-supos:一个可用的 MCP Server。
Client
页面大概这样,包括:左侧管理MCP Server、右侧聊天机器人
技术方案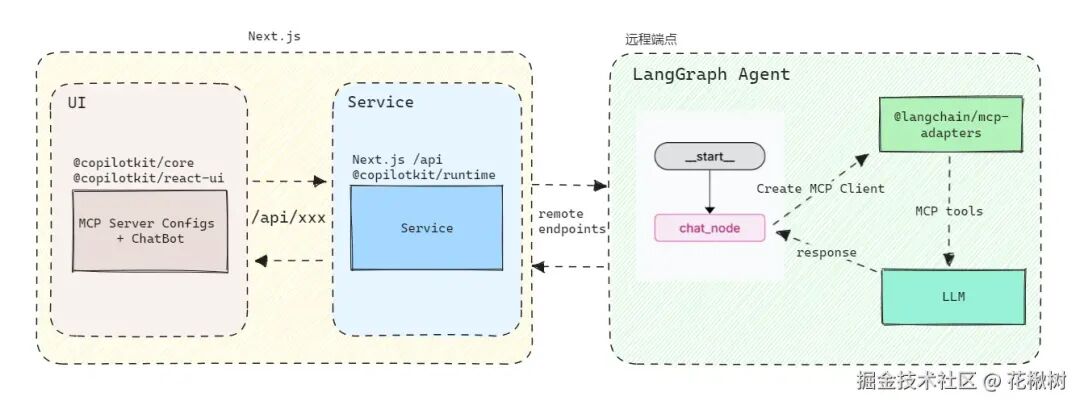
❝声明:此 Client 是基于CopilotKit 开源的 MCP Client open-mcp-client 二次改造
该代码库主要分为两个部分:
/agent– 连接到 MCP Server并调用其工具的LangGraph代理(Python)。/app– 使用 CopilotKit 进行UI和状态同步的前端应用程序(Next.js)。
由于 Python 的 agent 在 Windows 环境下运行时报错:
本人Python编码能力有限,基于此改造成了基于 JS 的 agent(/agent-js部分),后续均以agent-js为例;想用 Python 的也可按后续的改动点对 /agent 进行修改。
一、agent部分
文件结构
核心代码
「agent.js」 - 基于 langgraph 创建 workflow,其中主要节点为 chat_node,该节点功能点:
定义LLM
import { ChatOpenAI } from"@langchain/openai";
// import { HttpsProxyAgent } from "https-proxy-agent";

// const agentProxy = new HttpsProxyAgent("http://127.0.0.1:xxxx");
...
// 1 Define the model
const model = new ChatOpenAI(
    {
temperature: 0,
model: "gpt-4o",
    },
// todo: test, 走本地代理便于翻墙
// {
//   httpAgent: agentProxy,
// }
  );
...
❝「注意:本地联调需访问 openai 时,如果是使用的代理工具,还是需要在代码里指定代理地址(HttpsProxyAgent)」
❞
从 state获取MCP Server Configs,创建MCP Client连接到MCP Server,连通后获取Server的tools。(@langchain/mcp-adapters)
const mcpConfig: any = state.mcp_config || {};

// 重要:设置环境变量时,最好把当前进程的环境变量也传递过去,确保执行Server的子进程需要的环境变量都存在
let newMcpConfig: any = {};
Object.keys(mcpConfig).forEach((key) => {
    newMcpConfig[key] = { ...mcpConfig[key] };
if (newMcpConfig[key].env) {
      newMcpConfig[key].env = { ...process.env, ...newMcpConfig[key].env };
    }
  });

console.log("****mcpConfig****", mcpConfig);

// 2 Create client
const client = new MultiServerMCPClient(newMcpConfig);
// examples
// const client = new MultiServerMCPClient({
//   math: {
//     transport: "stdio",
//     command: "npx",
//     args: ["-y", "mcp-server-supos"],
//     env: {"SUPOS_API_KEY": "xxxxx"}
//   },
// });

// 3 Initialize connection to the server
await client.initializeConnections();
const tools = client.getTools();
基于 model和tools创建代理,并调用模型发送状态中的消息
// 4 Create the React agent width model and tools
const agent = createReactAgent({
llm: model,
    tools,
  });

// 5 Invoke the model with the system message and the messages in the state
const response = await agent.invoke({ messages: state.messages });
「完整代码」
agent.js
/**
 * This is the main entry point for the agent.
 * It defines the workflow graph, state, tools, nodes and edges.
 */

import { RunnableConfig } from"@langchain/core/runnables";
import {
  MemorySaver,
  START,
  StateGraph,
  Command,
  END,
} from"@langchain/langgraph";
import { createReactAgent } from"@langchain/langgraph/prebuilt";
import { Connection, MultiServerMCPClient } from"@langchain/mcp-adapters";
import { AgentState, AgentStateAnnotation } from"./state";
import { getModel } from"./model";

// 判断操作系统
const isWindows = process.platform === "win32";

const DEFAULT_MCP_CONFIG: Record<string, Connection> = {
supos: {
command: isWindows ? "npx.cmd" : "npx",
args: [
"-y",
"mcp-server-supos",
    ],
env: {
SUPOS_API_URL: process.env.SUPOS_API_URL || "",
SUPOS_API_KEY: process.env.SUPOS_API_KEY || "",
SUPOS_MQTT_URL: process.env.SUPOS_MQTT_URL || "",
    },
transport: "stdio",
  },
};

asyncfunctionchat_node(state: AgentState, config: RunnableConfig) {
// 1 Define the model
const model = getModel(state);

const mcpConfig: any = { ...DEFAULT_MCP_CONFIG, ...(state.mcp_config || {}) };

// 重要:设置环境变量时,最好把当前进程的环境变量也传递过去,确保执行Server的子进程需要的环境变量都存在
let newMcpConfig: any = {};
Object.keys(mcpConfig).forEach((key) => {
    newMcpConfig[key] = { ...mcpConfig[key] };
if (newMcpConfig[key].env) {
      newMcpConfig[key].env = { ...process.env, ...newMcpConfig[key].env };
    }
  });

console.log("****mcpConfig****", mcpConfig);

// 2 Create client
const client = new MultiServerMCPClient(newMcpConfig);
// const client = new MultiServerMCPClient({
//   math: {
//     transport: "stdio",
//     command: "npx",
//     args: ["-y", "mcp-server-supos"],
//     env: {"SUPOS_API_KEY": "xxxxx"}
//   },
// });

// 3 Initialize connection to the server
await client.initializeConnections();
const tools = client.getTools();

// 4 Create the React agent width model and tools
const agent = createReactAgent({
llm: model,
    tools,
  });

// 5 Invoke the model with the system message and the messages in the state
const response = await agent.invoke({ messages: state.messages });

// 6 Return the response, which will be added to the state
return [
new Command({
goto: END,
update: { messages: response.messages },
    }),
  ];
}

// Define the workflow graph
const workflow = new StateGraph(AgentStateAnnotation)
  .addNode("chat_node", chat_node)
  .addEdge(START, "chat_node");

const memory = new MemorySaver();

exportconst graph = workflow.compile({
checkpointer: memory,
});
model.js
/**
 * This module provides a function to get a model based on the configuration.
 */
import { BaseChatModel } from"@langchain/core/language_models/chat_models";
import { AgentState } from"./state";
import { ChatOpenAI } from"@langchain/openai";
import { ChatAnthropic } from"@langchain/anthropic";
import { ChatMistralAI } from"@langchain/mistralai";
// import { HttpsProxyAgent } from "https-proxy-agent";

// todo test agentProxy
// const agentProxy = new HttpsProxyAgent("http://127.0.0.1:7897");

functiongetModel(state: AgentState): BaseChatModel{
/**
   * Get a model based on the environment variable.
   */
const stateModel = state.model;
const stateModelSdk = state.modelSdk;
// 解密
const stateApiKey = atob(state.apiKey || "");
const model = process.env.MODEL || stateModel;

console.log(
`Using stateModelSdk: ${stateModelSdk}, stateApiKey: ${stateApiKey}, stateModel: ${stateModel}`
  );

if (stateModelSdk === "openai") {
returnnew ChatOpenAI({
temperature: 0,
model: model || "gpt-4o",
apiKey: stateApiKey || undefined,
    }
// {
//   httpAgent: agentProxy,
// }
    );
  }
if (stateModelSdk === "anthropic") {
returnnew ChatAnthropic({
temperature: 0,
modelName: model || "claude-3-7-sonnet-latest",
apiKey: stateApiKey || undefined,
    });
  }
if (stateModelSdk === "mistralai") {
returnnew ChatMistralAI({
temperature: 0,
modelName: model || "codestral-latest",
apiKey: stateApiKey || undefined,
    });
  }

thrownewError("Invalid model specified");
}

export { getModel };
state.js
import { Annotation } from"@langchain/langgraph";
import { CopilotKitStateAnnotation } from"@copilotkit/sdk-js/langgraph";
import { Connection } from"@langchain/mcp-adapters";

// Define the AgentState annotation, extending MessagesState
exportconst AgentStateAnnotation = Annotation.Root({
model: Annotation<string>,
modelSdk: Annotation<string>,
apiKey: Annotation<string>,
mcp_config: Annotation<Connection>,
  ...CopilotKitStateAnnotation.spec,
});

export type AgentState = typeof AgentStateAnnotation.State;
构建和运行
定义 langgraph.json配置文件,定义agent相关配置,比如agent名称:sample_agent等
{
"node_version": "20",
"dockerfile_lines": [],
"dependencies": ["."],
"graphs": {
"sample_agent": "./src/agent.ts:graph"// 定义agent名称等,用于前端指定使用
  },
"env": ".env"// 指定环境变量从.env文件中获取,生产环境可以删除该配置,从系统变量中获取
}
在本地运行时,在根路径 /agent-js 添加 .env 文件
LANGSMITH_API_KEY=lsv2_...OPENAI_API_KEY=sk-...
2.借助命令行工具@langchain/langgraph-cli进行构建和运行,在package.json中定义脚本:
"scripts": {
"start": "npx @langchain/langgraph-cli dev --host localhost --port 8123",
"dev": "npx @langchain/langgraph-cli dev --host localhost --port 8123 --no-browser"
  },
❝加上
❞--no-browser不会自动打开本地调试的studio页面
运行后可以在Studio预览联调等
(Studio:https://smith.langchain.com/studio/thread?baseUrl=http%3A%2F%2Flocalhost%3A8123)
注意点(踩坑记录)
1. 引入modelcontextprotocol/
typescript-sdk报错:
❝@modelcontextprotocol/sdk fails in CommonJS projects due to incompatible ESM-only dependency (pkce-challenge)
主要是modelcontextprotocol/
typescript-sdk的cjs包里面引用的pkce-challenge不支持cjs
官方的issues也有提出些解决方案,但目前为止官方还未发布解决了该问题的版本
❝「解决:
❞package.json添加"type": "module"字段,声明项目使用 「ES Modules (ESM)」 规范」
2. 配置 MCP Server 环境变量 env 问题
❝例如:Node.js 的
❞child_process.spawn()方法无法找到例如npx等可执行文件。
「环境变量PATH缺失」,系统未正确识别npx的安装路径。
可能的原因:
1)MCP Server配置了 env 参数后,导致传入的 env 覆盖了默认从父进程获取的环境变量
❝「解决:对配置了
env的Server,将当前的环境变量合并传入」
const mcpConfig: any = state.mcp_config || {};

// 重要:设置环境变量时,最好把当前进程的环境变量也传递过去,确保执行Server的子进程需要的环境变量都存在
let newMcpConfig: any = {};
Object.keys(mcpConfig).forEach((key) => {
    newMcpConfig[key] = { ...mcpConfig[key] };
if (newMcpConfig[key].env) {
      newMcpConfig[key].env = { ...process.env, ...newMcpConfig[key].env };
    }
  });
2) 「跨平台路径问题」:比如在 Windows 中直接调用 npx 需使用 npx.cmd
// 判断操作系统
const isWindows = process.platform === "win32";

const DEFAULT_MCP_CONFIG: Record<string, Connection> = {
supos: {
command: isWindows ? "npx.cmd" : "npx",
args: [
"-y",
"mcp-server-supos",
    ],
env: {
SUPOS_API_URL: process.env.SUPOS_API_URL || "",
SUPOS_API_KEY: process.env.SUPOS_API_KEY || "",
SUPOS_MQTT_URL: process.env.SUPOS_MQTT_URL || "",
    },
transport: "stdio",
  },
};
二、前端应用部分
前端应用部分改动主要是页面上的一些功能添加等,例如支持选模型,支持配置 env 参数等,页面功能相关的内容就略过,可以直接看 open-mcp-client,这里简单介绍下整体的一个架构。
架构方案
主要是 CopilotKit + Next.js,先看下 「CopilotKit」 官方的一个架构图:
根据本文实际用到的简化下(本文采用的 CoAgents模式)
核心代码(以Next.js为例)
❝核心依赖
@copilotkit/react-ui@copilotkit/react-core@copilotkit/runtime
1. 设置运行时端点
/app/api/copilotkit/route.ts:设置 agent 远程端点
import {
    CopilotRuntime,
    ExperimentalEmptyAdapter,
    copilotRuntimeNextJSAppRouterEndpoint,
    langGraphPlatformEndpoint
} from"@copilotkit/runtime";;
import { NextRequest } from"next/server";

// You can use any service adapter here for multi-agent support.
const serviceAdapter = new ExperimentalEmptyAdapter();

const runtime = new CopilotRuntime({
remoteEndpoints: [
        langGraphPlatformEndpoint({
// agent部署地址
deploymentUrl: `${process.env.AGENT_DEPLOYMENT_URL || 'http://localhost:8123'}`,
langsmithApiKey: process.env.LANGSMITH_API_KEY,
agents: [
                {
name: 'sample_agent', // agent 名称
description: 'A helpful LLM agent.',
                }
            ]
        }),
    ],
});

exportconst POST = async (req: NextRequest) => {
const { handleRequest } = copilotRuntimeNextJSAppRouterEndpoint({
        runtime,
        serviceAdapter,
endpoint: "/api/copilotkit",
    });

return handleRequest(req);
};
2. 页面接入 CopilotKit UI
/app/layout.tsx:页面最外层用 CopilotKit 包裹,配置 runtimeUrl 和 agent
import type { Metadata } from"next";
import { Geist, Geist_Mono } from"next/font/google";
import"./globals.css";
import"@copilotkit/react-ui/styles.css";
import { CopilotKit } from"@copilotkit/react-core";

const geistSans = Geist({
variable: "--font-geist-sans",
subsets: ["latin"],
});

const geistMono = Geist_Mono({
variable: "--font-geist-mono",
subsets: ["latin"],
});

exportconst metadata: Metadata = {
title: "Open MCP Client",
description: "An open source MCP client built with CopilotKit 🪁",
};

exportdefaultfunctionRootLayout({
  children,
}: Readonly<{
  children: React.ReactNode;
}>) {
return (
<htmllang="en">
<body
className={`${geistSans.variable} ${geistMono.variable} antialiasedw-screenh-screen`}
      >
<CopilotKit
runtimeUrl="/api/copilotkit"
agent="sample_agent"
showDevConsole={false}
        >
          {children}
</CopilotKit>
</body>
</html>
  );
}
/app/page.tsx:选择需要的聊天组件,例如 CopilotPopup
"use client";
import { CopilotPopup } from"@copilotkit/react-ui";

exportfunctionHome() {
return (
<>
<YourMainContent />
<CopilotChat
className="h-full flex flex-col"
instructions={
            "Youareassistingtheuserasbestasyoucan.Answerinthebestwaypossiblegiventhedatayouhave."
          }
labels={{
title: "MCPAssistant",
initial: "Needanyhelp?",
          }}
        />
</>
  );
}
构建和运行
这里就参照 Next.js 官方即可
package.json
"scripts": {
"dev-frontend": "pnpm i && next dev --turbopack",
"dev-agent-js": "cd agent-js && pnpm i && npx @langchain/langgraph-cli dev --host 0.0.0.0 --port 8123 --no-browser",
"dev-agent-py": "cd agent && poetry install && poetry run langgraph dev --host 0.0.0.0 --port 8123 --no-browser",
"dev": "pnpx concurrently \"pnpm dev-frontend\" \"pnpm dev-agent-js\" --names ui,agent --prefix-colors blue,green",
"build": "next build",
"start": "next start",
"lint": "next lint"
  },
Server
建议直接参考 MCP Server Typescript SDK 示例开发,官网文档的用法更新没那么及时,容易走弯路。
❝mcp-server-supos 是一个可用的 MCP Server,也发布了对应的 npm 包。
❞
这里截取核心代码片段,想了解更多可点击查看源码和使用文档等。
核心代码
提供tool-调用API查询信息 实时订阅MQTT topic数据进行缓存,用于提供 tool 查询分析最新数据 示例 server.resource
index.ts
#!/usr/bin/env node
import { McpServer } from"@modelcontextprotocol/sdk/server/mcp.js";
import { StdioServerTransport } from"@modelcontextprotocol/sdk/server/stdio.js";
import fetch from"node-fetch";
import { z } from"zod";
import fs, { readFileSync } from"fs";
import _ from"lodash";
import mqtt from"mqtt";
import { pathToFileURL } from"url";

import { createFilePath } from"./utils.js";

let SUPOS_API_URL =
  process.env.SUPOS_API_URL;
let SUPOS_API_KEY =
  process.env.SUPOS_API_KEY;
let SUPOS_MQTT_URL =
  process.env.SUPOS_MQTT_URL;

if (!SUPOS_API_URL) {
console.error("SUPOS_API_URL environment variable is not set");
  process.exit(1);
}

if (!SUPOS_API_KEY) {
console.error("SUPOS_API_KEY environment variable is not set");
  process.exit(1);
}

const filePath = createFilePath();
const fileUri = pathToFileURL(filePath).href;

asyncfunctiongetModelTopicDetail(topic: string): Promise<any> {
const url = `${SUPOS_API_URL}/open-api/supos/uns/model?topic=${encodeURIComponent(
    topic
  )}`;

const response = await fetch(url, {
headers: {
apiKey: `${SUPOS_API_KEY}`,
    },
  });

if (!response.ok) {
thrownewError(`SupOS API error: ${response.statusText}`);
  }

returnawait response.json();
}

functiongetAllTopicRealtimeData() {
// 缓存实时数据,定时写入缓存文件
const cache = newMap();
let timer: any = null;

const options = {
clean: true,
connectTimeout: 4000,
clientId: "emqx_topic_all",
rejectUnauthorized: false,
reconnectPeriod: 0, // 不进行重连
  };

const connectUrl = SUPOS_MQTT_URL;
if (!connectUrl) {
return;
  }

const client = mqtt.connect(connectUrl, options);

  client.on("connect", function () {
    client.subscribe("#", function (err) {
// console.log("err", err);
    });
  });

  client.on("message", function (topic, message) {
    cache.set(topic, message.toString());
  });

  client.on("error", function (error) {
// console.log("error", error);
  });
  client.on("close", function () {
if (timer) {
      clearInterval(timer);
    }
  });
// 每 5 秒批量写入一次
  timer = setInterval(() => {
const cacheJson = JSON.stringify(
Object.fromEntries(Array.from(cache)),
null,
2
    );
// 将更新后的数据写入 JSON 文件
    fs.writeFile(
      filePath,
      cacheJson,
      {
encoding: "utf-8",
      },
      (error) => {
if (error) {
          fs.writeFile(
            filePath,
JSON.stringify({ msg: "写入数据失败" }, null, 2),
            { encoding: "utf-8" },
            () => {}
          );
        }
      }
    );
  }, 5000);
}

functioncreateMcpServer() {
const server = new McpServer(
    {
name: "mcp-server-supos",
version: "0.0.1",
    },
    {
capabilities: {
tools: {},
      },
    }
  );

// Static resource
  server.resource("all-topic-realtime-data", fileUri, async (uri) => ({
contents: [
      {
uri: uri.href,
text: readFileSync(filePath, { encoding: "utf-8" }),
      },
    ],
  }));

  server.tool(
"get-model-topic-detail",
    { topic: z.string() },
async (args: any) => {
const detail = await getModelTopicDetail(args.topic);
return {
content: [{ type: "text", text: `${JSON.stringify(detail)}` }],
      };
    }
  );

  server.tool("get-all-topic-realtime-data", {}, async () => {
return {
content: [
        {
type: "text",
text: readFileSync(filePath, { encoding: "utf-8" }),
        },
      ],
    };
  });

asyncfunctionrunServer() {
const transport = new StdioServerTransport();
const serverConnect = await server.connect(transport);
console.error("SupOS MCP Server running on stdio");
return serverConnect;
  }

  runServer().catch((error) => {
console.error("Fatal error in main():", error);
    process.exit(1);
  });
}

asyncfunctionmain() {
try {
    createMcpServer();
    getAllTopicRealtimeData();
  } catch (error) {
console.error("Error in main():", error);
    process.exit(1);
  }
}

main();
utils.ts
import fs from"fs";
import path from"path";

exportfunctioncreateFilePath(
  filedir: string = ".cache",
  filename: string = "all_topic_realdata.json"
) {
// 获取项目根路径
const rootPath = process.cwd();

// 创建缓存目录
const filePath = path.resolve(rootPath, filedir, filename);
const dirPath = path.dirname(filePath);

// 检查目录是否存在,如果不存在则创建
if (!fs.existsSync(dirPath)) {
    fs.mkdirSync(dirPath, { recursive: true });
  }

return filePath;
}

exportfunctionreadFileSync(filePath: string, options: any) {
try {
return fs.readFileSync(filePath, options);
  } catch (err) {
return`读取文件时出错: ${err}`;
  }
}
如何使用
「Client」:目前支持MCP协议的客户端已有很多,比如桌面端应用 Claude for Desktop,或者IDE的一些插件等(VSCode 的 Cline 插件),想了解已支持的客户端可访问 Model Context Protocol Client
「Server」:除了官方例子Model Context Protocol Client 外,已有很多网站整合了 MCP Servers,例如 mcp.so, Glama 等。
下面列举几个介绍下:
1. 配合本文 web 版 Client 使用(以todoist-mcp-server为例子)
1)配置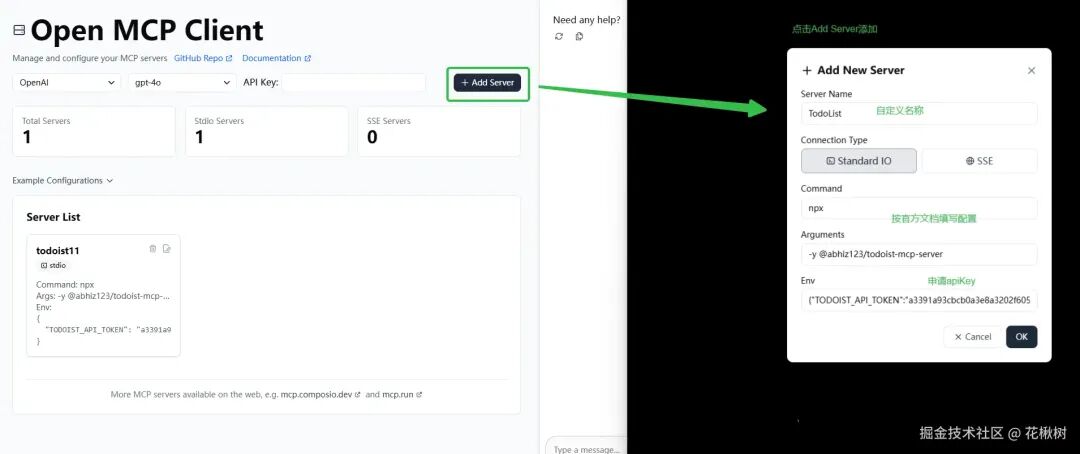
2)使用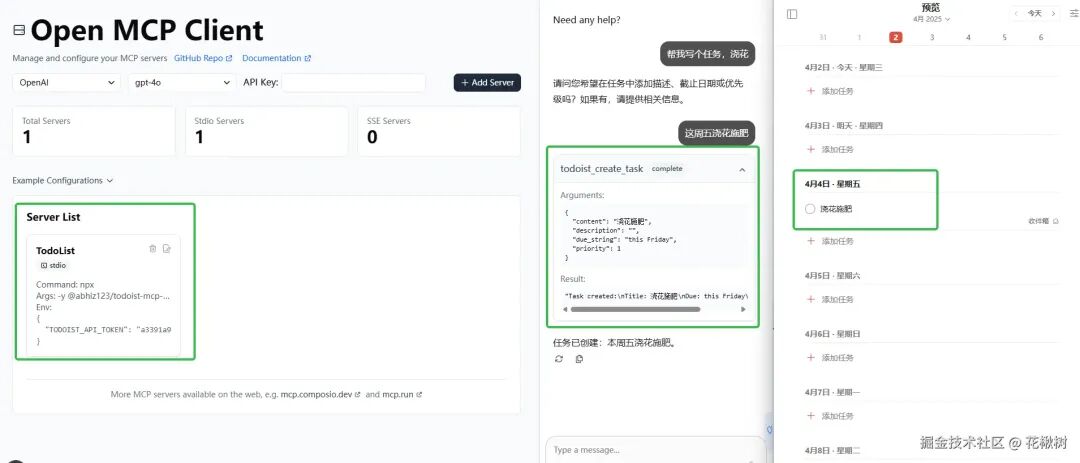
2. 配合 Claude 使用
具体可参考:mcp-server-supos README.md,服务换成自己需要的即可
3. 使用 VSCode 的 Cline 插件
由于使用 npx 找不到路径,这里以 node 执行本地文件为例
1)配置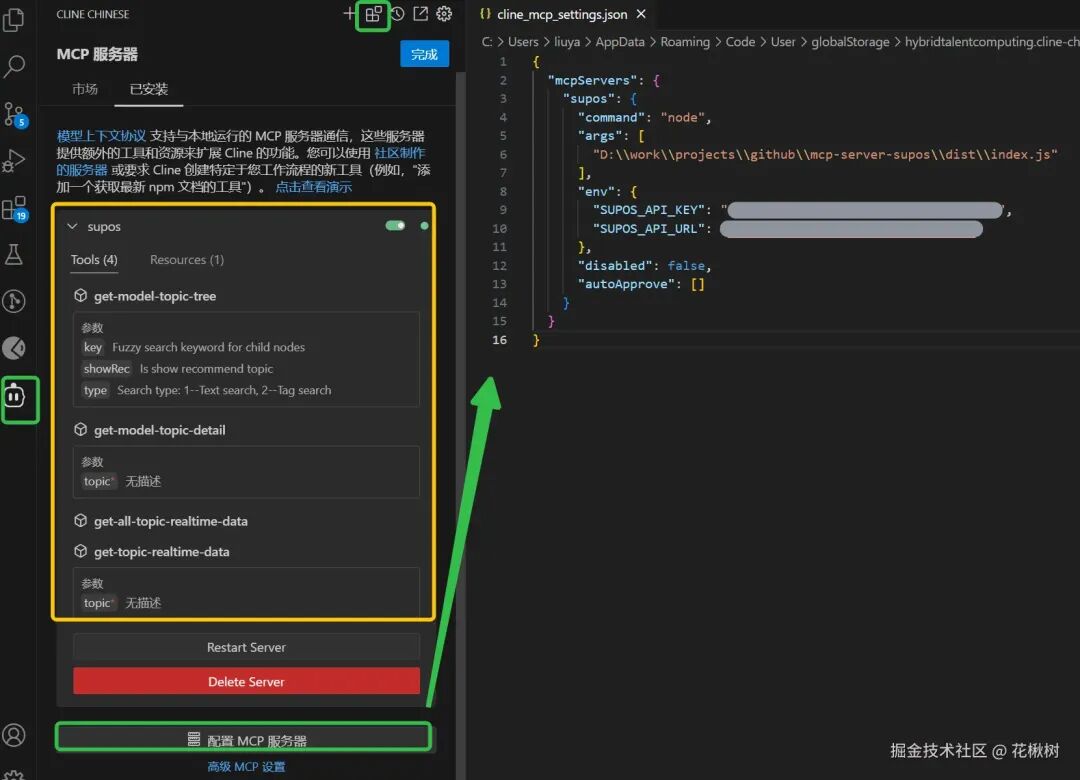
2)使用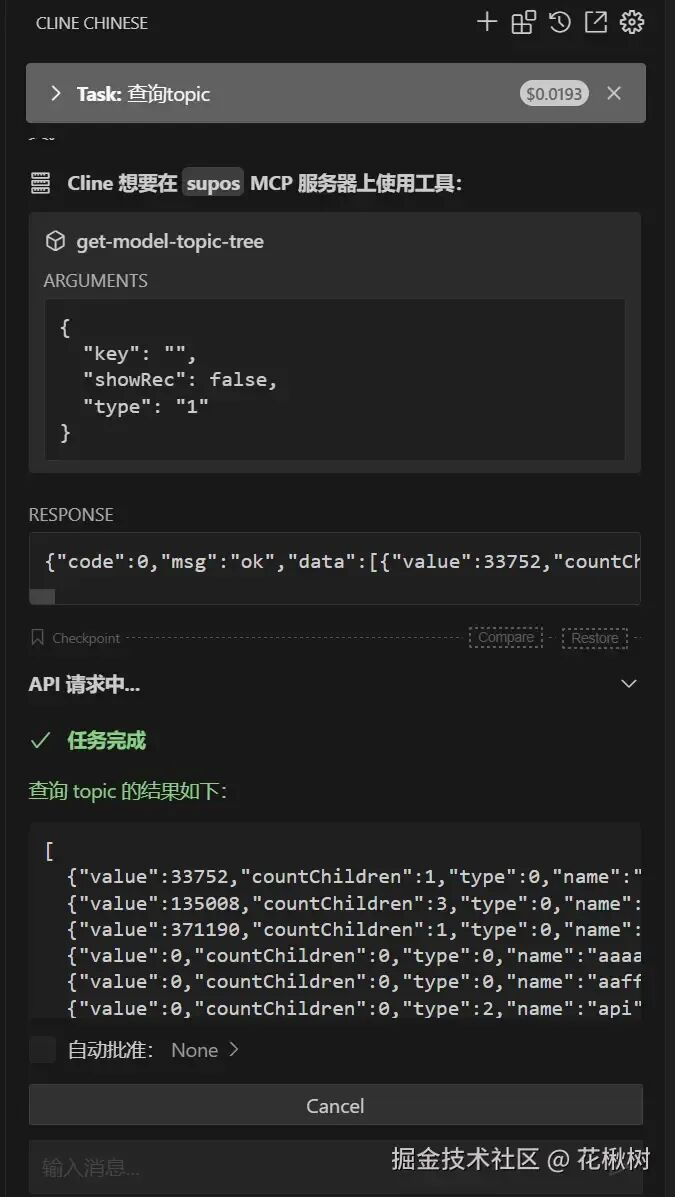
结语
以上便是近期使用 MCP 的一点小经验~
整理完后看了下,如果只是单纯想集成些 MCP Server,其实可以不用 agent 形式,直接使用 copilotkit 的标准模式,在本地服务调用 langchainjs-mcp-adapters 和 LLM 即可,例如:
import {
  CopilotRuntime,
  LangChainAdapter,
  copilotRuntimeNextJSAppRouterEndpoint,
} from'@copilotkit/runtime';
import { ChatOpenAI } from"@langchain/openai";
import { NextRequest } from'next/server';

// todo: 调用 @langchain/mcp-adapters 集成 MCP Server 获取 tools 给到大模型
 ...

const model = new ChatOpenAI({ model: "gpt-4o", apiKey: process.env.OPENAI_API_KEY });
const serviceAdapter = new LangChainAdapter({
chainFn: async ({ messages, tools }) => {
return model.bindTools(tools).stream(messages);
// or optionally enable strict mode
// return model.bindTools(tools, { strict: true }).stream(messages);
  }
});
const runtime = new CopilotRuntime();

exportconst POST = async (req: NextRequest) => {
const { handleRequest } = copilotRuntimeNextJSAppRouterEndpoint({
    runtime,
    serviceAdapter,
endpoint: '/api/copilotkit',
  });

return handleRequest(req);
};
但这样可能少了些上下文状态等,具体可以下来都试试~
点击关注公众号,“技术干货” 及时达!