Konva.js 实现 腾讯文档 多维表格
 热心市民小岳约 18 分钟
Konva.js 多维表格系统
基于 「Konva.js」 实现的高性能「多维表格系统」,支持大规模渲染、分组管理、筛选与排序等复杂功能,旨在构建类似腾讯文档 / 飞书多维表格的交互体验。
目录
一、项目概述 二、功能清单 三、核心架构设计 四、模块说明 五、关键机制 六、实现过程 七、性能优化 八、扩展 九、结语
一、项目概述
本项目使用 「Konva.js」 实现一个高性能的二维/多维表格系统,支持:
大规模表格渲染(行列可达数百万级) 按分组管理的数据展示 多维度筛选与排序 支持图片、文本、状态标签等多类型单元格 响应式布局与虚拟滚动优化
该系统适用于「任务管理」「资源调度」「项目需求规划」等复杂表格场景。
二、功能清单
三、核心架构设计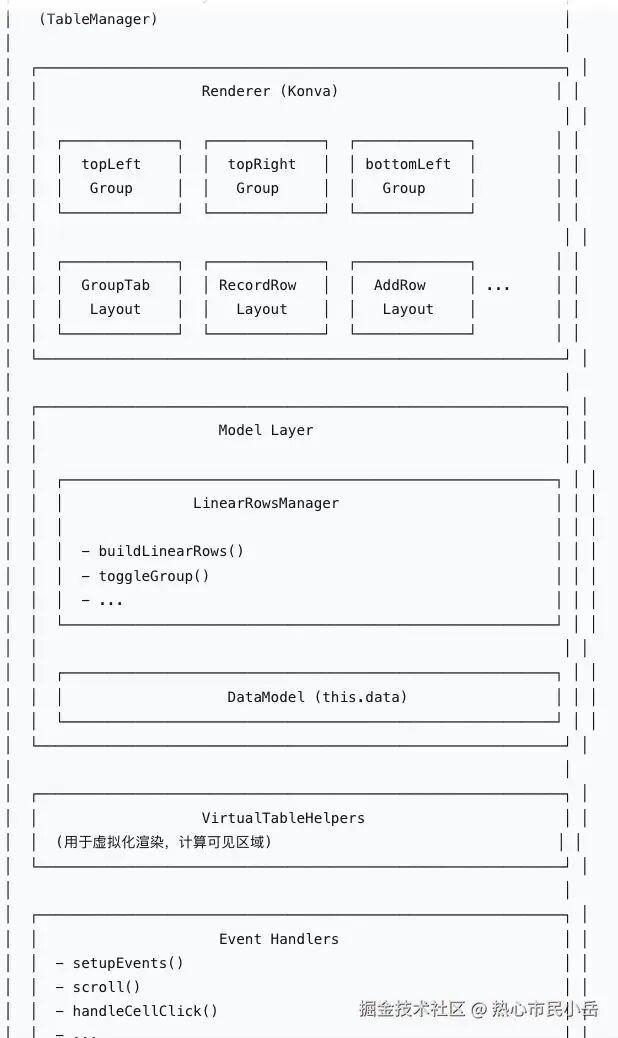
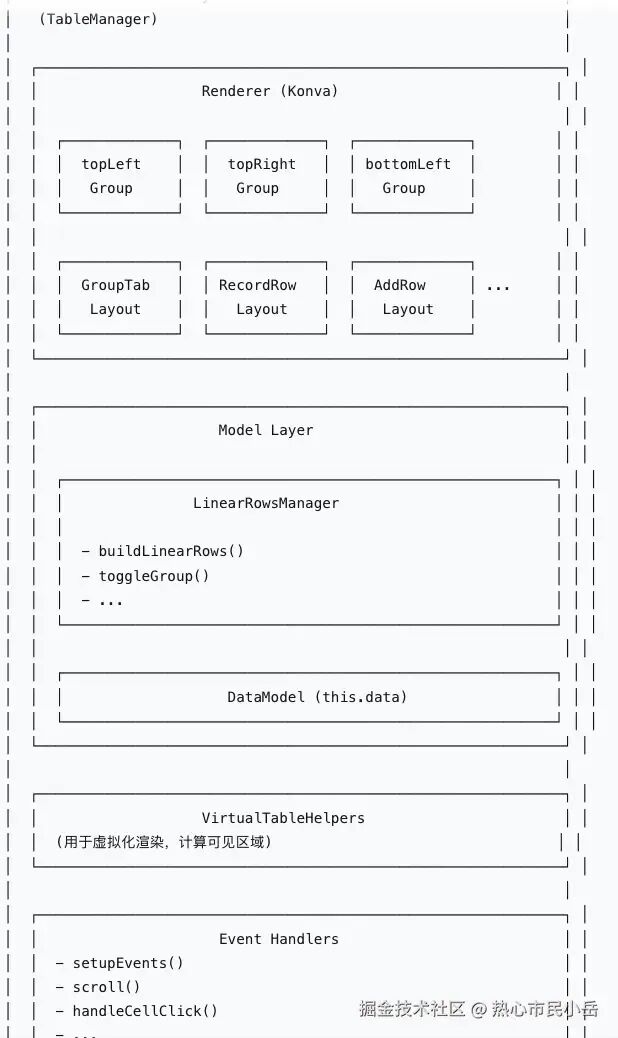
## 🎯 主控制器- **table**- 图层系统- `backgroundLayer` - 背景层- `bodyLayer` - 主体层- `featureLayer` - 特性层- 分组系统- `topLeft Group` - 左上冻结区域- `topRight Group` - 右上冻结区域- `bottomLeft Group` - 左下冻结区域- `bottomRight Group` - 右下冻结区域- 数据管理- **LinearRowsManager**- `linearRows: ILinearRow[]` - 线性行数据- `buildLinearRows()` - 构建行数据- `toggleGroup()` - 切换分组状态- 布局系统- **CellLayout** (抽象基类)- `GroupTabLayout` - 分组行布局- `RecordRowLayout` - 数据行布局- `AddRowLayout` - 添加行布局- `BlankRowLayout` - 空白行布局- `headerLayout` - 表头布局- 工具类- **VirtualTableHelpers**- `getItemMetadata()` - 获取项目元数据- `findNearestItem()` - 查找最近项目- `...` - 其他辅助方法- 事件处理- `setupEvents()` - 初始化事件- `scroll()` - 滚动处理- `handleCellClick()` - 单元格点击- `...` - 其他事件
四、模块说明
1. Renderer 模块
负责表格的可视化渲染逻辑:
使用 Konva.Layer管理背景层、内容层、交互层每一行或一组单元格使用 Konva.Group表示支持增量渲染与批量更新 通过矩阵坐标快速定位渲染区域
2. Model 模块
提供数据源抽象 支持筛选、排序、分组聚合与动态更新 通过观察者模式与渲染层同步数据变更
3. Controller 模块
监听用户输入事件(鼠标、滚动、拖拽) 控制渲染队列与更新节奏 管理当前选中状态与焦点单元格 与 Model 层进行数据同步
五、关键机制
1. 分组渲染(Group Rendering)
每个分组独立使用一个 Konva.Group折叠后仅渲染组头 展开时批量加载子节点 支持懒加载以优化性能
2. 虚拟滚动(Virtual Scrolling)
计算可视区域内应渲染的行列 减少内存占用与重绘次数 支持横向与纵向滚动同步
3. 批量绘制(Batch Draw)
ounter(lineounter(lineounter(lineounter(lineounter(lineounter(lineounter(lineounter(lineounter(lineounter(lineounter(lineounter(lineounter(lineprivate _waitingForDraw = false;private animQueue: Function[] = [];public batchDraw() {if (!this._waitingForDraw) {this._waitingForDraw = true;requestAnimationFrame(() => {this.animQueue.forEach(fn => fn());this.animQueue = [];this._waitingForDraw = false;});}}
六、实现过程
1. konva.js实现一个简单的表格绘制 但是这样太过于简单了 如果行列数量巨大且需要扩展显示 卡顿的比较严重。
ounter(lineounter(lineounter(lineounter(lineounter(lineounter(lineounter(lineounter(lineounter(lineounter(lineounter(lineounter(lineounter(lineounter(lineounter(lineounter(lineounter(lineounter(line// 绘制表格for(let row = 0; row < 10; row++) {for(let col = 0; col < 10; col++) {// 创建每个单元格const rect = new Konva.Rect({x: col * cellSize,y: row * cellSize,width: cellSize,height: cellSize,fill: 'lightgrey',stroke: 'black',strokeWidth: 1});// 将矩形添加到图层layer.add(rect);}}
2.使用辅助类 VirtualTableHelpers 这个类中提供了一系列的函数,如下图。通过offsetY和offsetX 以及 rowHeight colWidth 我们可以计算出当前可视区域 应该渲染哪些row 和 column。
ounter(lineounter(lineounter(lineounter(lineounter(lineounter(lineounter(lineounter(lineounter(lineounter(lineounter(lineounter(lineounter(lineounter(lineounter(lineounter(lineounter(lineounter(lineounter(lineounter(lineounter(lineounter(lineounter(lineounter(lineounter(lineounter(lineounter(lineounter(lineounter(lineounter(lineounter(lineounter(lineounter(lineounter(lineounter(lineounter(lineounter(lineounter(lineounter(lineounter(lineounter(lineounter(lineounter(lineounter(lineounter(lineounter(lineounter(lineounter(lineounter(lineounter(lineounter(lineounter(lineounter(lineounter(lineounter(lineounter(lineounter(lineounter(lineounter(lineounter(lineounter(lineounter(lineounter(lineounter(lineounter(lineounter(lineounter(lineounter(lineounter(lineounter(lineounter(lineounter(lineounter(lineounter(lineounter(lineounter(lineounter(lineounter(lineounter(linegetVisibleRowRange(frozenRowsHeight: number): { start: number; end: number } {const rowCount = this.linearRowsManager.getRowCount();const viewportHeight = this.visibleHeight - frozenRowsHeight - this.scrollBarSize;// 使用二分查找找到起始行(O(log n))const startRow = VirtualTableHelpers.getRowStartIndexForOffset({itemType: "row",rowHeight: this.getRowHeight,columnWidth: this.getColumnWidth,rowCount: rowCount,columnCount: this.cols,instanceProps: this.instanceProps,offset: this.scrollY});// 基于起始行计算结束行(增量计算)const endRow = VirtualTableHelpers.getRowStopIndexForStartIndex({startIndex: Math.max(this.frozenRows, startRow),rowCount: rowCount,rowHeight: this.getRowHeight,columnWidth: this.getColumnWidth,scrollTop: this.scrollY,containerHeight: viewportHeight,instanceProps: this.instanceProps});// 添加缓冲区(预渲染上下各 2 行)const buffer = 2;return {start: Math.max(this.frozenRows, startRow - buffer),end: Math.min(rowCount - 1, endRow + buffer)};}getVisibleColRange(frozenColsWidth: number): { start: number; end: number } {const viewportWidth = this.visibleWidth - frozenColsWidth - this.scrollBarSize;const startCol = VirtualTableHelpers.getColumnStartIndexForOffset({itemType: "column",rowHeight: this.getRowHeight,columnWidth: this.getColumnWidth,rowCount: this.rows,columnCount: this.cols,instanceProps: this.instanceProps,offset: this.scrollX});const endCol = VirtualTableHelpers.getColumnStopIndexForStartIndex({startIndex: Math.max(this.frozenCols, startCol),rowHeight: this.getRowHeight,columnWidth: this.getColumnWidth,instanceProps: this.instanceProps,containerWidth: viewportWidth,scrollLeft: this.scrollX,columnCount: this.cols});const buffer = 2;return {start: Math.max(this.frozenCols, startCol - buffer),end: Math.min(this.cols - 1, endCol + buffer)};}// 渲染一下即可看到效果// 渲染单元格 - 从 leftPadding 开始for (let row = visibleRows.start; row <= visibleRows.end; row++) {const height = this.getRowHeight(row);if (currentY + height >= frozenRowsHeight &¤tY <= this.visibleHeight - this.scrollBarSize) {let currentX = this.leftPadding;for (let col = 0; col < this.frozenCols; col++) {const width = this.getColumnWidth(col);const cell = this.createCell(row, col, currentX, currentY, width, height);this.groups.bottomLeft.add(cell);currentX += width;}}currentY += height;}}
填充一点数据即可 到这里一个高性能的表格也就成了 但是我们是要实现多维表格 还有段距离。
3. 画布分层 以及 兼容冻结行列。(相对有点难度 )
使用 bodyLayer更新不那么频繁且渲染成本较高, 渲染 静态表格数据。 使用featureLayer渲染 用户选区,横纵滚动条,高亮等等用户交互。 为什么这样做 : bodyLayer更新不那么频繁且渲染成本较高,featureLayer更新渲染非常频繁,bodyLayer不受影响。 我们定义一个 Canvas类专门处理画布,首先创建画布
ounter(lineounter(lineounter(lineounter(lineounter(lineounter(lineounter(linesetupLayers() {this.backgroundLayer = new Konva.Layer({ name: 'backgroundLayer' });this.bodyLayer = new Konva.Layer({ name: 'bodyLayer' });this.featureLayer = new Konva.Layer({ name: 'featureLayer' });this.stage.add(this.backgroundLayer, this.bodyLayer, this.featureLayer);}
接下来就是处理冻结行列,冻结行列我计划分成四块区域 | 或者说四个组 来渲染,如图,区域 | 组可以使用layer| group来划分,这里我采用konva.group来划分,因为官网说了不建议过多的layer
「固定行冻结为一列 列假设设置成4列 计算出冻结区域」 这样我们就为每一个group确定了应有的宽高,拖动行列滚动条的时候 就只需要更新 右下角的group就可以了,也需要重新计算bottomRight可视区域内的行列起始行列,为什么不需要处理其他三个区域呢 因为冻结不能冻结超出屏幕以外的行列。
ounter(lineounter(lineounter(lineounter(lineounter(lineounter(lineounter(lineounter(lineounter(lineounter(lineounter(lineounter(lineounter(lineounter(lineounter(lineounter(lineounter(lineounter(lineounter(lineounter(lineounter(lineounter(lineounter(lineounter(lineounter(lineounter(lineounter(lineounter(lineounter(lineounter(lineounter(lineounter(lineounter(lineounter(lineounter(lineounter(lineounter(lineounter(lineounter(lineounter(lineounter(lineounter(lineounter(line// 创建四个分组this.groups = {topLeft: new Konva.Group(),topRight: new Konva.Group(),bottomLeft: new Konva.Group(),bottomRight: new Konva.Group(),};this.bodyLayer.add(...Object.values(this.groups))裁剪一下实现冻结的效果setClipping() {const frozenColsWidth = this.core.getFrozenColsWidth() + 1;const frozenRowsHeight = this.core.getFrozenRowsHeight();// 为每个Group设置裁剪this.groups.topRight.clipFunc((ctx) => {ctx.rect(frozenColsWidth,0,this.visibleWidth - frozenColsWidth,frozenRowsHeight);});this.groups.bottomLeft.clipFunc((ctx) => {ctx.rect(0,frozenRowsHeight,frozenColsWidth,this.visibleHeight - frozenRowsHeight);});this.groups.bottomRight.clipFunc((ctx) => {ctx.rect(frozenColsWidth,frozenRowsHeight,this.visibleWidth - frozenColsWidth,this.visibleHeight - frozenRowsHeight);});}
滚动条不需要在讲解了 在之前实现 腾讯文档甘特图时已说过实现。定义一个HorizontalBarScrollbar类来测试一下 , 创建滚动条 , 并且注册dragmove事件 更新offsetX从而来确定 显示的行列以及 offsetX渲染起点。测试结果
ounter(lineounter(lineounter(lineounter(lineounter(lineounter(lineounter(lineounter(lineounter(lineounter(lineounter(lineounter(lineounter(lineounter(lineounter(lineounter(lineounter(lineounter(lineounter(lineounter(lineounter(lineounter(lineounter(lineounter(lineounter(lineounter(lineounter(lineounter(lineounter(lineounter(lineounter(lineounter(lineounter(lineounter(lineounter(lineounter(lineounter(lineounter(lineounter(lineounter(lineounter(lineounter(lineounter(lineounter(lineounter(lineounter(lineounter(lineounter(lineounter(lineounter(lineounter(lineounter(lineounter(lineounter(lineounter(linecreateScrollBars() {const { canvas } = this;// 创建滚动条背景和滑块this.hScrollBg = new Konva.Rect({fill: "#f0f0f0",stroke: "#e0e0e0",strokeWidth: 1,});this.hScrollThumb = new Konva.Rect({fill: "#cccecf",cornerRadius: 4,draggable: true,});// 添加到主图层canvas.bodyLayer.add(this.hScrollBg, this.hScrollThumb);this.setupScrollBarEvents();}public setupScrollBarEvents() {let isDraggingHScroll = false;// 水平滚动条事件this.hScrollThumb.on("mousedown touchstart", () => {isDraggingHScroll = true;});this.hScrollThumb.on("dragmove touchmove", () => {if (isDraggingHScroll) {const frozenColsWidth = this.core.getFrozenColsWidth();const scrollableWidth =this.canvas.visibleWidth - frozenColsWidth - this.config.scrollBarSize;const thumbWidth = this.hScrollThumb.width();let thumbX = this.hScrollThumb.x();thumbX = Math.max(frozenColsWidth,Math.min(thumbX, frozenColsWidth + scrollableWidth - thumbWidth));this.hScrollThumb.x(thumbX);this.hScrollThumb.y(this.canvas.visibleHeight - this.config.scrollBarSize + 1); // 固定Y坐标if (scrollableWidth > thumbWidth) {const scrollRatio =(thumbX - frozenColsWidth) / (scrollableWidth - thumbWidth);this.scrollX = scrollRatio * this.maxScrollX;this.core.render.batchDraw();}}});this.canvas.stage.on("mouseup touchend", () => {isDraggingHScroll = false;// isDraggingVScroll = false;});
* 这里有两个小点需要注意一下
* 1. dragmove的时候我们只需要更新 groupRight 内的行列即可 不需要针对整个画布, 优化渲染。
* 2. dragmove会频繁调用render去更新 groupRight内容, 这里需要优化一下
* 通过 `requestAnimationFrame` 和队列机制将多个绘制请求合并,确保在同一帧内只执行一次实际的绘制操作,从而避免了不必要的多次渲染,提升了性能
ounter(lineounter(lineounter(lineounter(lineounter(lineounter(lineounter(lineounter(lineounter(lineounter(lineounter(lineounter(lineounter(lineounter(lineounter(lineounter(lineounter(lineounter(lineounter(lineounter(lineounter(lineounter(lineounter(lineounter(lineounter(lineounter(lineounter(lineounter(lineounter(lineounter(lineounter(lineprivate _waitingForDraw = false;private animQueue = [] as Array<Function>;public batchDraw() {if (!this._waitingForDraw) {this._waitingForDraw = true;this.requestAnimFrame(() => {this.render();this._waitingForDraw = false;});}return this;}private requestAnimFrame(callback: Function) {this.animQueue.push(callback);if (this.animQueue.length === 1) {req(() => {const queue = this.animQueue;this.animQueue = [];queue.forEach(function (cb) {cb();});});}}render() {this.renderContent();this.core.updateScrollBars();}
4.分组的实现 ( 难点 )
1.前期准备
先来调研一下腾讯文档的 我们就光靠这个效果需要分析出如何实现分组的效果 经过苦思冥想, 想出来两套方案。最终我选择了第二种,因为我对于第二种的思路好打开一点
ounter(lineounter(lineounter(line定义好嵌套数据格式1 通过每一个嵌套数据,一组一组的渲染,对于需要结合可视区域渲染来说 稍有难度。2.不要被嵌套给影响 还是一行一行的渲染 ,分组头我也按照行来渲染 只不过需要控制行缩进
一组一组的渲染的效果
一行一行的渲染 ( 我在使用这种的方案实现的时候 没有经过太多的困难 => 比较推荐)
2.定义处理分组的类
ounter(lineounter(lineounter(lineounter(lineounter(lineounter(lineounter(lineounter(lineounter(lineounter(lineounter(lineounter(lineounter(lineounter(lineounter(lineounter(lineounter(lineounter(lineounter(lineounter(lineounter(lineounter(lineounter(lineounter(lineounter(lineounter(lineounter(lineounter(lineounter(lineounter(lineounter(lineounter(lineounter(lineounter(lineounter(lineounter(lineounter(lineounter(lineounter(lineounter(lineounter(lineounter(lineounter(lineounter(lineounter(lineounter(lineounter(lineounter(lineounter(lineounter(lineounter(lineounter(lineounter(lineounter(lineounter(lineounter(lineounter(lineounter(line先定义行存在哪些类型export enum CellType {Record = 'Record',GroupTab = 'GroupTab',AddRow = 'AddRow',BlankRow = 'BlankRow',Header = 'Header'}// 处理分组的类export class LinearRowsManager {private linearRows: ILinearRow[] = [];private rawData: any[][] = [];private groupConfig: { field: string; enabled: boolean } = { field: '', enabled: false };private groupStates = new Map<string, boolean>(); // 保存分组展开状态constructor(data: any[][]) {this.rawData = data;}// 支持多级分组的构建方法buildLinearRows(groupFields?: string[]): ILinearRow[] {this.linearRows = [];this.groupConfig = {fields: groupFields || [],enabled: !!(groupFields && groupFields.length > 0)};// 表头行(始终存在)this.linearRows.push({type: CellType.Header,recordId: 'header-row',depth: 0,dataIndex: 0,displayIndex: 0} as ILinearRowHeader);if (!this.groupConfig.enabled) {// 无分组:直接映射所有数据行for (let i = 1; i < this.rawData.length; i++) {this.linearRows.push({type: CellType.Record,recordId: `record-${i}`,depth: 0,dataIndex: i,displayIndex: i} as ILinearRowRecord);}} else {// 多级分组:递归构建分组树this.buildMultiLevelGroups();}return this.linearRows;}
class中还定义了一些其他方法
在render中开启分组 this.enableMultiLevelGrouping(['负责人', '开始时间', '状态']); 看下 groupRight如何渲染的, 核心思维就是要生成 createCell
ounter(lineounter(lineounter(lineounter(lineounter(lineounter(lineounter(lineounter(lineounter(lineounter(lineounter(lineounter(lineounter(lineounter(lineounter(lineounter(lineounter(lineounter(lineounter(lineounter(lineounter(lineounter(lineounter(lineounter(lineounter(lineounter(lineounter(lineounter(lineounter(lineounter(lineounter(lineounter(lineounter(lineounter(lineounter(lineounter(lineounter(lineounter(lineounter(lineounter(lineounter(lineounter(lineounter(lineounter(lineounter(line//renderBottomRight() {console.time('renderBottomRight');const frozenColsWidth = this.getFrozenColsWidth();const frozenRowsHeight = this.getFrozenRowsHeight();const visibleRows = this.getVisibleRowRange(frozenRowsHeight);if (visibleRows.start > visibleRows.end) {console.timeEnd('renderBottomRight');return;}const visibleCols = this.getVisibleColRange(frozenColsWidth);if (visibleCols.start > visibleCols.end) {console.timeEnd('renderBottomRight');return;}// 先绘制背景this.renderLevel1GroupBackgrounds(visibleRows, frozenColsWidth, frozenRowsHeight, 'bottomRight');this.renderLevel2GroupBackgrounds(visibleRows, frozenColsWidth, frozenRowsHeight, 'bottomRight');const colPositions = this.preCalculateColPositions(visibleCols, frozenColsWidth);let currentY = frozenRowsHeight - this.scrollY;for (let row = this.frozenRows; row < visibleRows.start; row++) {currentY += this.getRowHeight(row);}for (let row = visibleRows.start; row <= visibleRows.end; row++) {const height = this.getRowHeight(row);for (let i = 0, col = visibleCols.start; col <= visibleCols.end; col++, i++) {const width = this.getColumnWidth(col);const x = colPositions[i];const cell = this.createCell(row, col, x, currentY, width, height);this.groups.bottomRight.add(cell);}currentY += height;}console.timeEnd('renderBottomRight');}
设定一个createCell函数 你要返回一个正确的 cell group出来,需要处理 枚举的五种类型的渲染方式。 五种类型的渲染方式各有不同 我们可以通过布局思想来定义一下,分别处理渲染。
ounter(lineounter(lineounter(lineounter(lineounter(lineounter(lineounter(lineexport enum CellType {Record = 'Record',GroupTab = 'GroupTab',AddRow = 'AddRow',BlankRow = 'BlankRow',Header = 'Header'}
先定义一个基类
ounter(lineounter(lineounter(lineounter(lineounter(lineounter(lineounter(lineounter(lineounter(lineounter(lineounter(lineounter(lineounter(lineounter(lineounter(lineounter(lineexport abstract class CellLayout {protected ctx: CanvasRenderingContext2D;protected x: number = 0;protected y: number = 0;protected width: number = 0;protected height: number = 0;setPosition(x: number, y: number, width: number, height: number) {this.x = x;this.y = y;this.width = width;this.height = height;}abstract render(row: ILinearRow, col: number, isFirstCol: boolean, isLastCol: boolean): Konva.Group;}
以分组行布局来举例。 主要是处理分组行的缩进 以及折叠的事件 后续还要扩展 统计之类的功能。
ounter(lineounter(lineounter(lineounter(lineounter(lineounter(lineounter(lineounter(lineounter(lineounter(lineounter(lineounter(lineounter(lineounter(lineounter(lineounter(lineounter(lineounter(lineounter(lineounter(lineounter(lineounter(lineounter(lineounter(lineounter(lineounter(lineounter(lineounter(lineounter(lineounter(lineounter(lineounter(lineounter(lineounter(lineounter(lineounter(lineounter(lineounter(lineounter(lineounter(lineounter(lineounter(lineounter(lineounter(lineounter(lineounter(lineounter(lineounter(lineounter(lineounter(lineounter(lineounter(lineounter(lineounter(lineounter(lineounter(lineounter(lineounter(lineounter(lineounter(lineounter(lineounter(lineounter(lineounter(lineounter(lineounter(lineounter(lineounter(lineounter(lineounter(lineounter(lineounter(lineounter(lineounter(lineounter(lineounter(lineounter(lineounter(lineounter(lineounter(lineounter(lineounter(lineounter(lineounter(lineounter(lineounter(lineounter(lineounter(lineounter(lineounter(lineounter(lineounter(lineounter(lineounter(lineounter(lineounter(lineounter(lineounter(lineounter(lineounter(lineounter(lineounter(lineounter(lineounter(lineounter(lineounter(lineounter(lineounter(lineounter(lineclass GroupTabLayout extends CellLayout {render(row: ILinearRow, col: number, isFirstCol: boolean, isLastCol: boolean): Konva.Group {const group = new Konva.Group({ x: this.x, y: this.y });const groupRow = row as ILinearRowGroup;const depth = row.depth;const bgColor = this.getGroupBackground(depth);const indentOffset = depth * 20; // 根据层级缩进if(isFirstCol) {// 第一列:展开/折叠图标和分组标题const bgRect = new Konva.Rect({x: indentOffset,y: 0,width: this.width - indentOffset,height: this.height,fill: bgColor,stroke: '#e0e0e0',strokeWidth: 0.5});// 只有非最后一层的分组才显示展开/折叠图标const showExpandIcon = groupRow.children && groupRow.children.some(child =>child.type === CellType.GroupTab);const icon = new Konva.Text({x: indentOffset + 15,y: this.height / 2,text: showExpandIcon ? (groupRow.expanded ? '▼': '▶') : '',fontSize: 8,fill: '#4a5568',listening: showExpandIcon});const titleText = new Konva.Text({x: indentOffset + (showExpandIcon ? 30 : 15),y: this.height / 2 - 5,text: `${groupRow.groupTitle} (${groupRow.recordCount})`,fontSize: 8,fill: '#2d3748',fontWeight: 'bold'});if(showExpandIcon) {bgRect.on('click', () => {bgRect.fire('toggleGroup', { groupId: groupRow.groupId });});icon.on('click', () => {icon.fire('toggleGroup', { groupId: groupRow.groupId });});}group.add(bgRect, icon, titleText);} else if (col === 1) {// 第二列:分组字段信息const bgRect = new Konva.Rect({width: this.width,height: this.height,fill: bgColor,stroke: '#e0e0e0',strokeWidth: 0.5});const fieldLabel = new Konva.Text({x: 10,y: 6,text: `${this.getGroupFieldLabel(depth)}: ${groupRow.groupField}`,fontSize: 7,fill: '#718096'});const valueLabel = new Konva.Text({x: 10,y: this.height / 2 + 2,text: groupRow.groupTitle,fontSize: 13,fontWeight: 'bold',fill: '#2d3748'});group.add(bgRect, fieldLabel);} else {// 其他列:空背景const bgRect = new Konva.Rect({width: this.width,height: this.height,fill: bgColor,stroke: '#e0e0e0',strokeWidth: 0.5});group.add(bgRect);}return group;}private getGroupBackground(depth: number): string {// const colors = ['#f7fafc', '#edf2f7', '#e2e8f0', '#cbd5e0'];const colors = ['#FFF', '#F5F5F5', '#FFF', '#cbd5e0'];return colors[Math.min(depth, colors.length - 1)];}private getGroupFieldLabel(depth: number): string {const labels = ['一级分组', '二级分组', '三级分组'];return labels[Math.min(depth, labels.length - 1)] || '分组';}}
全部定义好了 全部在 render类中实例化
ounter(lineounter(lineounter(lineounter(lineounter(lineounter(lineounter(lineounter(lineounter(lineounter(lineounter(lineounter(linethis.linearRowsManager = new LinearRowsManager(this.data);this.linearRowsManager.buildLinearRows(); // 初始无分组// 初始化布局渲染器this.groupTabLayout = new GroupTabLayout();this.recordRowLayout = new RecordRowLayout(this.data,this.colsConfig);this.addRowLayout = new AddRowLayout();this.blankRowLayout = new BlankRowLayout();this.headerLayout = new headerLayout(this.iconManager, this.columns);
正确处理后 生成单元格
ounter(lineounter(lineounter(lineounter(lineounter(lineounter(lineounter(lineounter(lineounter(lineounter(lineounter(lineounter(lineounter(lineounter(lineounter(lineounter(lineounter(lineounter(lineounter(lineounter(lineounter(lineounter(lineounter(lineounter(lineounter(lineounter(lineounter(lineounter(lineounter(lineounter(lineounter(lineounter(lineounter(lineounter(lineounter(lineounter(lineounter(lineounter(lineounter(lineounter(lineounter(lineounter(lineounter(lineounter(lineounter(lineounter(lineounter(lineounter(lineounter(lineounter(lineounter(linecreateCell(rowIndex: number, col: number, x: number, y: number, width: number, height: number): Konva.Group {const row = this.linearRowsManager.getRow(rowIndex);if (!row) return new Konva.Group();const isFirstCol = col === 0;const headerRow = rowIndex === 0;const isLastCol = col === this.cols - 1;let layout: CellLayout;switch (row.type) {case CellType.GroupTab:layout = this.groupTabLayout;break;case CellType.AddRow:layout = this.addRowLayout;break;case CellType.BlankRow:layout = this.blankRowLayout;break;case CellType.Header:layout = this.headerLayout;break;case CellType.Record:layout = this.recordRowLayout;break;default:layout = this.recordRowLayout;break;}layout.setPosition(x, y, width, height);const cellGroup = layout.render(row, col, isFirstCol, isLastCol);// 监听分组折叠事件if (row.type === CellType.GroupTab) {cellGroup.on('toggleGroup', (e: any) => {this.linearRowsManager.toggleGroup(e.groupId);this.render();});}// 监听 AddRow 点击事件if (row.type === CellType.AddRow) {cellGroup.on('addRow', (e: any) => {this.handleAddRow(e.groupId);});}return cellGroup;}
来看下渲染结果
七、性能优化
cell单元格的值: 可能会在公式 引用之类的大数据量计算,这里我使用web worker。 数据统计和筛选,排序,查找这些使用 异步分片来实现。 多维表格中的 icon及image的缓存与复用等等...
example:在单元格渲染时计算复杂计算时 使用web worker来计算 然后textNode.text(result)实现单个单元格更新
ounter(lineounter(lineounter(lineounter(lineounter(lineounter(lineounter(lineounter(lineounter(lineounter(lineounter(line// cacl(40)if (textContext && textContext.includes('cacl')) {this.alloyWorker.cookie.exportStaion(Math.random() * 10 >= 5 ? 40 : 39).then((result) => {const groups = this.groups.bottomRight.find(`#${row}-${col}`) as Group[];if (groups.length) {const textNode = groups[0].children[1] as Konva.Text;textNode.text(result);}})textContext = '计算中...';}
统计之类的使用异步分片 ,可以动态控制fps的变化 来控制处理数据量 。
八、扩展性
用户选区实现起来也很简单
ounter(lineounter(lineounter(lineounter(lineounter(lineounter(lineounter(lineounter(lineounter(lineounter(lineounter(lineounter(lineounter(lineounter(lineounter(lineounter(lineounter(lineounter(lineounter(lineounter(lineounter(lineounter(lineounter(lineounter(lineounter(lineounter(lineounter(lineounter(lineounter(lineounter(lineounter(lineounter(lineounter(lineounter(lineounter(lineounter(lineounter(lineounter(lineounter(lineounter(lineounter(lineounter(lineounter(lineounter(lineounter(lineounter(lineounter(lineounter(lineounter(lineounter(lineounter(lineounter(lineounter(lineounter(lineounter(lineounter(lineounter(lineounter(lineounter(lineounter(lineounter(lineounter(lineounter(lineounter(lineounter(lineounter(lineounter(lineounter(lineounter(lineounter(lineounter(lineounter(lineounter(lineounter(lineounter(lineounter(lineounter(lineounter(lineounter(lineounter(lineounter(lineounter(lineounter(lineounter(lineounter(lineounter(lineounter(lineounter(lineounter(lineounter(lineounter(lineounter(lineounter(lineounter(lineounter(lineounter(lineounter(lineounter(lineounter(lineounter(lineounter(lineounter(lineounter(lineounter(lineounter(lineounter(lineounter(lineounter(lineounter(lineounter(lineounter(lineounter(lineounter(lineounter(lineounter(lineounter(lineounter(lineexport class SelectionNodeManager {public topRect: Konva.Rect;public rightRect: Konva.Rect;public bottomRect: Konva.Rect;public leftRect: Konva.Rect;public selectionBorder: Konva.Rect;public activeCellBorder: Konva.Rect;constructor() {const fillConfig = {fill: "rgba(0, 123, 255, 0.1)",visible: false,listening: false,};this.topRect = new Konva.Rect(fillConfig);this.rightRect = new Konva.Rect(fillConfig);this.bottomRect = new Konva.Rect(fillConfig);this.leftRect = new Konva.Rect(fillConfig);this.selectionBorder = new ThinBorderRect({fill: "transparent",stroke: "#1e6fff",strokeWidth: 1,visible: false,listening: false,}) as any;this.activeCellBorder = new Konva.Rect({fill: "transparent",stroke: "#1e6fff",strokeWidth: 2,visible: false,listening: false,});}update({selectionX,selectionY,selectionWidth,selectionHeight,activeCellX,activeCellY,activeCellWidth,activeCellHeight}) {// 计算相对位置const relX = activeCellX - selectionX;const relY = activeCellY - selectionY;// 1. 上方区域this.topRect.setAttrs({x: selectionX,y: selectionY,width: selectionWidth,height: relY,visible: relY > 0});// 2. 右侧区域const rightWidth = selectionWidth - (relX + activeCellWidth);this.rightRect.setAttrs({x: activeCellX + activeCellWidth,y: activeCellY,width: rightWidth,height: activeCellHeight,visible: rightWidth > 0});// 3. 下方区域const bottomHeight = selectionHeight - (relY + activeCellHeight);this.bottomRect.setAttrs({x: selectionX,y: activeCellY + activeCellHeight,width: selectionWidth,height: bottomHeight,visible: bottomHeight > 0});// 4. 左侧区域this.leftRect.setAttrs({x: selectionX,y: activeCellY,width: relX,height: activeCellHeight,visible: relX > 0});// 5. 整体边框this.selectionBorder.setAttrs({x: selectionX,y: selectionY,width: selectionWidth,height: selectionHeight,visible: true});// 6. 活动单元格边框this.activeCellBorder.setAttrs({x: activeCellX + 1,y: activeCellY + 1,width: activeCellWidth - 1,height: activeCellHeight - 1,visible: true});}hide() {this.topRect.visible(false);this.rightRect.visible(false);this.bottomRect.visible(false);this.leftRect.visible(false);this.selectionBorder.visible(false);this.activeCellBorder.visible(false);}}
生成选区节点 监听事件并且更新选区即可。还有一个边界就不细说了
结语
存在疑问的可以留言,还有许多功能需要开发 打磨,有进展了再发文章。 这篇文章主要帮大家打开思路, 一步一步地解决一个困难功能的实现。