Python办公自动化之Word文档自动化:全网最全,看这一篇就够了!
P 点击关注 👉约 17 分钟
点击关注 👉约 17 分钟
作者:超级大洋葱806
来源:https://blog.csdn.net/u014779536/article/details/108418066
环境安装
使用Python操作word大部分情况都是写操作,也有少许情况会用到读操作,在本次教程中都会进行讲解,本次课程主要用到以下4个库,请大家提前安装。
升级pip(便于安装最新库)
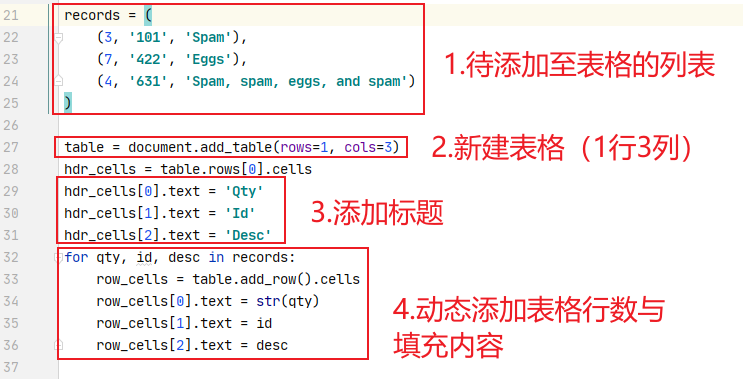
新建表格操作

1
环境安装
使用Python操作word大部分情况都是写操作,也有少许情况会用到读操作,在本次教程中都会进行讲解,本次课程主要用到以下4个库,请大家提前安装。
升级pip(便于安装最新库)
python -m pip install -U pip setuptools
pip install python-docx
官方文档: https://python-docx.readthedocs.io/en/latest/index.html win32com(主要用作doc转docx格式转换用) 安装方法:from docx import Documentfrom docx.shared import Inches
pip install pypiwin32使用方法:
官方文档: https://docs.microsoft.com/en-us/dotnet/api/microsoft.office.interop.word?view=word-pia mailmerge(用作按照模板生成大量同类型文档) 安装方法:import win32comfrom win32com.client import Dispatch, constants
pip install docx-mailmerge
from mailmerge import MailMergepip install matplotlib
import matplotlib.pyplot as plt
👉点击领取:最全Python资料合集
Python-docx 新建文档
示例代码1:效果如下:from docx import Documentdocument = Document()document.save('new.docx')
效果如下:from docx import Documentdef GenerateNewWord(filename):document = Document()document.save(filename)if __name__ == "__main__":print("大家好!我们今天开始学习word文档自动化")print("我们先来直接生成一个名为‘new.docx’的文档")document = Document()document.save('new.docx')print("没错,里面什么都没有")# 我是华丽的分隔符print("我们使用函数生成一个word文档试试")newname = '使用函数生成的文档.docx'GenerateNewWord(newname)
Python-docx 编辑已存在文档
我们很多时候需要在已存在的word文档上添加自己的内容,那么我们赶紧看看应该怎样操作吧~ 旧文档:
也许你会说,没有没搞错,就这三句话?是的,就这三句,你就完成了旧文档的复制,如果你想修改,直接添加内容就行了呢! 效果如下:from docx import Documentdocument = Document('exist.docx')document.save('new.docx')
win32com 将 doc 转为 docx
旧文档:
效果如下:import osfrom win32com import client as wcdef TransDocToDocx(oldDocName,newDocxName):print("我是 TransDocToDocx 函数")# 打开word应用程序word = wc.Dispatch('Word.Application')# 打开 旧word 文件doc = word.Documents.Open(oldDocName)# 保存为 新word 文件,其中参数 12 表示的是docx文件doc.SaveAs(newDocxName, 12)# 关闭word文档doc.Close()word.Quit()print("生成完毕!")if __name__ == "__main__":# 获取当前目录完整路径currentPath = os.getcwd()print("当前路径为:",currentPath)# 获取 旧doc格式word文件绝对路径名docName = os.path.join(currentPath,'旧doc格式文档.doc')print("docFilePath = ", docName)# 设置新docx格式文档文件名docxName = os.path.join(currentPath,'新生成docx格式文档.docx')TransDocToDocx(docName,docxName)
win32com 操作 word
打开新的word文档并添加内容 示例代码:效果如下:import win32comfrom win32com.client import Dispatch, constantsimport os# 创建新的word文档def funOpenNewFile():word = Dispatch('Word.Application')# 或者使用下面的方法,使用启动独立的进程:# word = DispatchEx('Word.Application')# 如果不声明以下属性,运行的时候会显示的打开wordword.Visible = 1 # 0:后台运行 1:前台运行(可见)word.DisplayAlerts = 0 # 不显示,不警告# 创建新的word文档doc = word.Documents.Add()# 在文档开头添加内容myRange1 = doc.Range(0, 0)myRange1.InsertBefore('Hello word\n')# 在文档末尾添加内容myRange2 = doc.Range()myRange2.InsertAfter('Bye word\n')# 在文档i指定位置添加内容i = 0myRange3 = doc.Range(0, i)myRange3.InsertAfter("what's up, bro?\n")# doc.Save() # 保存doc.SaveAs(os.getcwd() + "\\funOpenNewFile.docx") # 另存为doc.Close() # 关闭 word 文档word.Quit() # 关闭 officeif __name__ == '__main__':print("当前文件路径名:",os.getcwd())print("调用funOpenNewFile()")funOpenNewFile()
效果如下:import win32comfrom win32com.client import Dispatch, constantsimport os# 打开已存在的word文件def funOpenExistFile():word = Dispatch('Word.Application')# 或者使用下面的方法,使用启动独立的进程:# word = DispatchEx('Word.Application')# 如果不声明以下属性,运行的时候会显示的打开wordword.Visible = 1 # 0:后台运行 1:前台运行(可见)word.DisplayAlerts = 0 # 不显示,不警告doc = word.Documents.Open(os.getcwd() + "\\3.1 win32com测试.docx") # 打开一个已有的word文档# 在文档开头添加内容myRange1 = doc.Range(0, 0)myRange1.InsertBefore('Hello word\n')# 在文档末尾添加内容myRange2 = doc.Range()myRange2.InsertAfter('Bye word\n')# 在文档i指定位置添加内容i = 0myRange3 = doc.Range(0, i)myRange3.InsertAfter("what's up, bro?\n")# doc.Save() # 保存doc.SaveAs(os.getcwd() + "\\funOpenExistFile.docx") # 另存为doc.Close() # 关闭 word 文档word.Quit() # 关闭 officeif __name__ == '__main__':print("当前文件路径名:",os.getcwd())print("调用funOpenExistFile()")funOpenExistFile()
效果如下:import win32comfrom win32com.client import Dispatch, constantsimport os# 生成Pdf文件def funGeneratePDF():word = Dispatch("Word.Application")word.Visible = 0 # 后台运行,不显示word.DisplayAlerts = 0 # 不警告doc = word.Documents.Open(os.getcwd() + "\\3.3 win32com转换word为pdf等格式.docx") # 打开一个已有的word文档doc.SaveAs(os.getcwd() + "\\3.3 win32com转换word为pdf等格式.pdf", 17) # txt=4, html=10, docx=16, pdf=17doc.Close()word.Quit()if __name__ == '__main__':funGeneratePDF()
Python-docx 操作 word
官方文档:(最权威指南,没有之一) https://python-docx.readthedocs.io/en/latest/ Python-docx官方例程 前提条件:
最终效果:from docx import Documentfrom docx.shared import Inchesdocument = Document()document.add_heading('Document Title', 0)p = document.add_paragraph('A plain paragraph having some ')p.add_run('bold').bold = Truep.add_run(' and some ')p.add_run('italic.').italic = Truedocument.add_heading('Heading, level 1', level=1)document.add_paragraph('Intense quote', style='Intense Quote')document.add_paragraph('first item in unordered list', style='List Bullet')document.add_paragraph('first item in ordered list', style='List Number')document.add_picture('countrygarden.png', width=Inches(1.25))records = ((3, '101', 'Spam'),(7, '422', 'Eggs'),(4, '631', 'Spam, spam, eggs, and spam'))table = document.add_table(rows=1, cols=3)hdr_cells = table.rows[0].cellshdr_cells[0].text = 'Qty'hdr_cells[1].text = 'Id'hdr_cells[2].text = 'Desc'for qty, id, desc in records:row_cells = table.add_row().cellsrow_cells[0].text = str(qty)row_cells[1].text = idrow_cells[2].text = descdocument.add_page_break()document.save('4.1 Python-docx官方例程.docx')
from docx import Documentfrom docx.shared import Inchesdocument = Document()document = Document('exist.docx')document.add_heading('Document Title', 0)
p = document.add_paragraph('A plain paragraph having some ')p.add_run('bold').bold = True # 添加粗体文字p.add_run(' and some ') # 添加默认格式文字p.add_run('italic.').italic = True # 添加斜体文字
document.add_heading('Heading, level 1', level=1)
添加无序列表操作document.add_paragraph('Intense quote', style='Intense Quote')# 以下两句的含义等同于上面一句p = document.add_paragraph('Intense quote')p.style = 'Intense Quote'
document.add_paragraph( 'first item in unordered list', style='List Bullet')document.add_paragraph( 'first item in ordered list', style='List Number')
document.add_picture('countrygarden.png', width=Inches(1.25))table = document.add_table(rows=1, cols=3)为每组内容添加数据行并填充hdr_cells = table.rows[0].cellshdr_cells[0].text = 'Qty'hdr_cells[1].text = 'Id'hdr_cells[2].text = 'Desc'
设置标题样式操作for qty, id, desc in records:row_cells = table.add_row().cellsrow_cells[0].text = str(qty)row_cells[1].text = idrow_cells[2].text = desc
table.style = 'LightShading-Accent1'
document.add_page_break()document.save('4.1 Python-docx官方例程.docx')遍历所有样式:from docx import *document = Document()table = document.add_table(3, 3, style="Medium Grid 1 Accent 1")heading_cells = table.rows[0].cellsheading_cells[0].text = '第一列内容'heading_cells[1].text = '第二列内容'heading_cells[2].text = '第三列内容'document.save("demo.docx")
效果如下(大家按照喜欢的样式添加即可):from docx.enum.style import WD_STYLE_TYPEfrom docx import Documentdocument = Document()styles = document.styles# 生成所有表样式for s in styles:if s.type == WD_STYLE_TYPE.TABLE:document.add_paragraph("表格样式 : " + s.name)table = document.add_table(3, 3, style=s)heading_cells = table.rows[0].cellsheading_cells[0].text = '第一列内容'heading_cells[1].text = '第二列内容'heading_cells[2].text = '第三列内容'document.add_paragraph("\n")document.save('4.3 所有表格样式.docx')
docx&matplotlib 自动生成数据分析报告
最终效果
表格内容:import xlrdxlsx = xlrd.open_workbook('./3_1 xlrd 读取 操作练习.xlsx')# 通过sheet名查找:xlsx.sheet_by_name("sheet1")# 通过索引查找:xlsx.sheet_by_index(3)table = xlsx.sheet_by_index(0)# 获取单个表格值 (2,1)表示获取第3行第2列单元格的值value = table.cell_value(2, 1)print("第3行2列值为",value)# 获取表格行数nrows = table.nrowsprint("表格一共有",nrows,"行")# 获取第4列所有值(列表生成式)name_list = [str(table.cell_value(i, 3)) for i in range(1, nrows)]print("第4列所有的值:",name_list)
获取结果:# 获取学习成绩信息def GetExcelInfo():print("开始获取表格内容信息")# 打开指定文档xlsx = xlrd.open_workbook('学生成绩表格.xlsx')# 获取sheetsheet = xlsx.sheet_by_index(0)# 获取表格行数nrows = sheet.nrowsprint("一共 ",nrows," 行数据")# 获取第2列,和第4列 所有值(列表生成式),从第2行开始获取nameList = [str(sheet.cell_value(i, 1)) for i in range(1, nrows)]scoreList = [int(sheet.cell_value(i, 3)) for i in range(1, nrows)]# 返回名字列表和分数列表return nameList,scoreList
效果如下:# 将名字和分数列表合并成字典(将学生姓名和分数关联起来)scoreDictionary = dict(zip(nameList, scoreList))print("dictionary:",scoreDictionary)# 对字典进行值排序,高分在前,reverse=True 代表降序排列scoreOrder = sorted(scoreDictionary.items(), key=lambda x: x[1], reverse=True)print("scoreOrder",scoreOrder)
# 合成的字典dictionary: {'Dillon Miller': 41, 'Laura Robinson': 48, 'Gabrilla Rogers': 28, 'Carlos Chen': 54, 'Leonard Humphrey': 44, 'John Hall': 63, 'Miranda Nelson': 74, 'Jessica Morgan': 34, 'April Lawrence': 67, 'Cindy Brown': 52, 'Cassandra Fernan': 29, 'April Crawford': 91, 'Jennifer Arias': 61, 'Philip Walsh': 58, 'Christina Hill P': 14, 'Justin Dunlap': 56, 'Brian Lynch': 84, 'Michael Brown': 68}# 排序后,再次转换成列表scoreOrder [('April Crawford', 91), ('Brian Lynch', 84), ('Miranda Nelson', 74), ('Michael Brown', 68), ('April Lawrence', 67), ('John Hall', 63), ('Jennifer Arias', 61), ('Philip Walsh', 58), ('Justin Dunlap', 56), ('Carlos Chen', 54), ('Cindy Brown', 52), ('Laura Robinson', 48), ('Leonard Humphrey', 44), ('Dillon Miller', 41), ('Jessica Morgan', 34), ('Cassandra Fernan', 29), ('Gabrilla Rogers', 28), ('Christina Hill P', 14)]
效果如下:# 生成学生成绩柱状图(使用matplotlib)# 会生成一张名为"studentScore.jpg"的图片def GenerateScorePic(scoreList):# 解析成绩列表,生成横纵坐标列表xNameList = [str(studentInfo[0]) for studentInfo in scoreList]yScoreList = [int(studentInfo[1]) for studentInfo in scoreList]print("xNameList",xNameList)print("yScoreList",yScoreList)# 设置字体格式matplotlib.rcParams['font.sans-serif'] = ['SimHei'] # 用黑体显示中文# 设置绘图尺寸plt.figure(figsize=(10,5))# 绘制图像plt.bar(x=xNameList, height=yScoreList, label='学生成绩', color='steelblue', alpha=0.8)# 在柱状图上显示具体数值, ha参数控制水平对齐方式, va控制垂直对齐方式for x1, yy in scoreList:plt.text(x1, yy + 1, str(yy), ha='center', va='bottom', fontsize=16, rotation=0)# 设置标题plt.title("学生成绩柱状图")# 为两条坐标轴设置名称plt.xlabel("学生姓名")plt.ylabel("学生成绩")# 显示图例plt.legend()# 坐标轴旋转plt.xticks(rotation=90)# 设置底部比例,防止横坐标显示不全plt.gcf().subplots_adjust(bottom=0.25)# 保存为图片plt.savefig("studentScore.jpg")# 直接显示plt.show()
# 开始生成报告def GenerateScoreReport(scoreOrder,picPath):# 新建一个文档document = Document()# 设置标题document.add_heading('数据分析报告', 0)# 添加第一名的信息p1 = document.add_paragraph("分数排在第一的学生姓名为: ")p1.add_run(scoreOrder[0][0]).bold = Truep1.add_run(" 分数为: ")p1.add_run(str(scoreOrder[0][1])).italic = True# 添加总体情况信息p2 = document.add_paragraph("共有: ")p2.add_run(str(len(scoreOrder))).bold = Truep2.add_run(" 名学生参加了考试,学生考试的总体情况: ")# 添加考试情况表格table = document.add_table(rows=1, cols=2)table.style = 'Medium Grid 1 Accent 1'hdr_cells = table.rows[0].cellshdr_cells[0].text = '学生姓名'hdr_cells[1].text = '学生分数'for studentName,studentScore in scoreOrder:row_cells = table.add_row().cellsrow_cells[0].text = studentNamerow_cells[1].text = str(studentScore)# 添加学生成绩柱状图document.add_picture(picPath, width=Inches(6))document.save('学生成绩报告.docx')
import xlrdimport matplotlibimport matplotlib.pyplot as pltfrom docx import Documentfrom docx.shared import Inches# 获取学习成绩信息def GetExcelInfo():print("开始获取表格内容信息")# 打开指定文档xlsx = xlrd.open_workbook('学生成绩表格.xlsx')# 获取sheetsheet = xlsx.sheet_by_index(0)# 获取表格行数nrows = sheet.nrowsprint("一共 ",nrows," 行数据")# 获取第2列,和第4列 所有值(列表生成式),从第2行开始获取nameList = [str(sheet.cell_value(i, 1)) for i in range(1, nrows)]scoreList = [int(sheet.cell_value(i, 3)) for i in range(1, nrows)]# 返回名字列表和分数列表return nameList,scoreList# 生成学生成绩柱状图(使用matplotlib)# 会生成一张名为"studentScore.jpg"的图片def GenerateScorePic(scoreList):# 解析成绩列表,生成横纵坐标列表xNameList = [str(studentInfo[0]) for studentInfo in scoreList]yScoreList = [int(studentInfo[1]) for studentInfo in scoreList]print("xNameList",xNameList)print("yScoreList",yScoreList)# 设置字体格式matplotlib.rcParams['font.sans-serif'] = ['SimHei'] # 用黑体显示中文# 设置绘图尺寸plt.figure(figsize=(10,5))# 绘制图像plt.bar(x=xNameList, height=yScoreList, label='学生成绩', color='steelblue', alpha=0.8)# 在柱状图上显示具体数值, ha参数控制水平对齐方式, va控制垂直对齐方式for x1, yy in scoreList:plt.text(x1, yy + 1, str(yy), ha='center', va='bottom', fontsize=16, rotation=0)# 设置标题plt.title("学生成绩柱状图")# 为两条坐标轴设置名称plt.xlabel("学生姓名")plt.ylabel("学生成绩")# 显示图例plt.legend()# 坐标轴旋转plt.xticks(rotation=90)# 设置底部比例,防止横坐标显示不全plt.gcf().subplots_adjust(bottom=0.25)# 保存为图片plt.savefig("studentScore.jpg")# 直接显示plt.show()# 开始生成报告def GenerateScoreReport(scoreOrder,picPath):# 新建一个文档document = Document()# 设置标题document.add_heading('数据分析报告', 0)# 添加第一名的信息p1 = document.add_paragraph("分数排在第一的学生姓名为: ")p1.add_run(scoreOrder[0][0]).bold = Truep1.add_run(" 分数为: ")p1.add_run(str(scoreOrder[0][1])).italic = True# 添加总体情况信息p2 = document.add_paragraph("共有: ")p2.add_run(str(len(scoreOrder))).bold = Truep2.add_run(" 名学生参加了考试,学生考试的总体情况: ")# 添加考试情况表格table = document.add_table(rows=1, cols=2)table.style = 'Medium Grid 1 Accent 1'hdr_cells = table.rows[0].cellshdr_cells[0].text = '学生姓名'hdr_cells[1].text = '学生分数'for studentName,studentScore in scoreOrder:row_cells = table.add_row().cellsrow_cells[0].text = studentNamerow_cells[1].text = str(studentScore)# 添加学生成绩柱状图document.add_picture(picPath, width=Inches(6))document.save('学生成绩报告.docx')if __name__ == "__main__":# 调用信息获取方法,获取用户信息nameList,scoreList = GetExcelInfo()# print("nameList:",nameList)# print("ScoreList:",scoreList)# 将名字和分数列表合并成字典(将学生姓名和分数关联起来)scoreDictionary = dict(zip(nameList, scoreList))# print("dictionary:",scoreDictionary)# 对字典进行值排序,高分在前,reverse=True 代表降序排列scoreOrder = sorted(scoreDictionary.items(), key=lambda x: x[1], reverse=True)# print("scoreOrder",scoreOrder)# 将进行排序后的学生成绩列表生成柱状图GenerateScorePic(scoreOrder)# 开始生成报告picPath = "studentScore.jpg"GenerateScoreReport(scoreOrder,picPath)print("任务完成,报表生成完毕!")
Python-docx 修改旧 word 文档
回顾:打开旧文档,并另存为新文档 我们这里就拿上一节生成的学生成绩报告作为示例:读取word文档的内容 示例代码:from docx import Documentif __name__ == "__main__":document = Document('6 学生成绩报告.docx')# 在这里进行操作,此处忽略document.save('修改后的报告.docx')
效果如下:from docx import Documentif __name__ == "__main__":document = Document('6 学生成绩报告.docx')# 读取 word 中所有内容for p in document.paragraphs:print("paragraphs:",p.text)# 读取 word 中所有一级标题for p in document.paragraphs:if p.style.name == 'Heading 1':print("Heading 1:",p.text)# 读取 word 中所有二级标题for p in document.paragraphs:if p.style.name == 'Heading 2':print("Heading 2:", p.text)# 读取 word 中所有正文for p in document.paragraphs:if p.style.name == 'Normal':print("Normal:", p.text)document.save('修改后的报告.docx')
效果如下:from docx import Documentif __name__ == "__main__":document = Document('6 学生成绩报告.docx')# 读取表格内容for tb in document.tables:for i,row in enumerate(tb.rows):for j,cell in enumerate(row.cells):text = ''for p in cell.paragraphs:text += p.textprint(f'第{i}行,第{j}列的内容{text}')document.save('修改后的报告.docx')
效果如下:from docx import Documentif __name__ == "__main__":document = Document('6 学生成绩报告.docx')# 修改 word 中所有内容for p in document.paragraphs:p.text = "修改后的段落内容"# 修改表格内容for tb in document.tables:for i,row in enumerate(tb.rows):for j,cell in enumerate(row.cells):text = ''for p in cell.paragraphs:p.text = ("第",str(i),"行",str(j),"列")print(f'第{i}行,第{j}列的内容{text}')document.save('6.4 修改后的报告.docx')
docx-mailmerge 自动生成万份劳动合同
创建合同模板 添加内容框架
效果如下:from mailmerge import MailMergetemplate = '薪资证明模板.docx'document = MailMerge(template)document.merge(name = '唐星',id = '1010101010',year = '2020',salary = '99999',job = '嵌入式软件开发工程师')document.write('生成的1份证明.docx')
效果如下:from mailmerge import MailMergefrom datetime import datetime# 生成单份合同def GenerateCertify(templateName,newName):# 打开模板document = MailMerge(templateName)# 替换内容document.merge(name='唐星',id='1010101010',year='2020',salary='99999',job='嵌入式软件开发工程师')# 保存文件document.write(newName)if __name__ == "__main__":templateName = '薪资证明模板.docx'# 获得开始时间startTime = datetime.now()# 开始生成for i in range(10000):newName = f'./10000份证明/薪资证明{i}.docx'GenerateCertify(templateName,newName)# 获取结束时间endTime = datetime.now()# 计算时间差allSeconds = (endTime - startTime).secondsprint("生成10000份合同一共用时: ",str(allSeconds)," 秒")print("程序结束!")

热门推荐